QuickStart
We are going to deploy a federated infrastructure where CometCloud will orchestrate the execution of workflows across different federated resources. In this case we will federate a Cluster and a Cloud (i.e. Chameleon Alamo). The deployment will look like as follows.
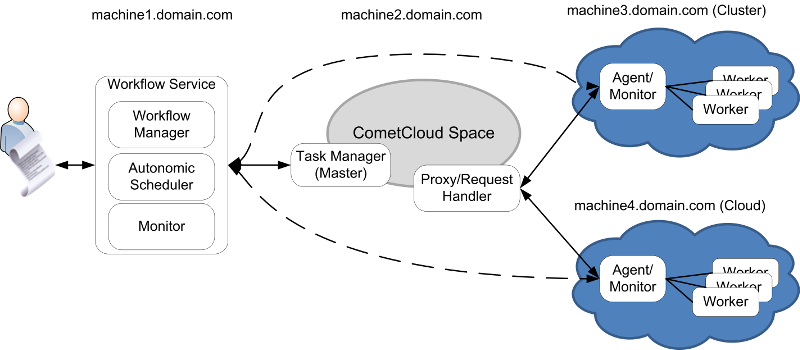
Figure: Simple CometCloud Deployment
Download Software
Please visit the download section to obtain the software.
All you need for this guide is located inside the cometWorkflow.tgz file that you downloaded. This file can be uncompressed using tar vxfz cometWorkflow.tgz, and it contains three directories dist, lib, and simple_run. The two first contain libraries and the last one contains scripts and examples to help with the deployment.
Requirements
This guide requires your system to have Java 1.7+ runtime installed, rsync, and python 2.6+.
Deploy Workflow Manager
We deploy the workflow manager in machine1.domain.com, the workflow service is listening in port 8888 and the autonomic scheduler in port 7778. Moreover, we reference to the Task Generator/WorkflowMaster machine that is located in machine2.domain.com listening in port`7777`. More details about the workflow manager can be found in the Configuring Workflow Manager and Autonomic Scheduler Section.
Open a terminal and go to the directory simple_run/workflow, that you got after uncompressing the cometWorkflow.tgz file.
Edit manager.properties file
publicIpManager=machine1.domain.com
portManager=8888

logFile=/tmp/WorkflowManager.log

#task generator(workflowMaster)
workflowmasterURI=machine2.domain.com:7777

#resource manager and autonomic scheduler
StartCentralManager=true
CentralManagerAddress=machine1.domain.com
CentralManagerPort=7778

MonitorInterval=60
Starting the Service
Once the configuration is ready, you can start the workflow manager and autonomic scheduler by executing the script startWorkflowManager.sh. This script contains the following code that defines the CLASSPATH and executes the appropriated java class.
$ ./startWorkflowManager.sh
Deploy Task Manager
We deploy the task manager in machine2.domain.com. The task manager is listening in port 7777 for commands from workflow manager, the proxy is listening in port 12342 (default IsolatedProxyPort) for task requests from agents, and the task manager is listening in port 12340 (defult TCP_CONTROL_PORT) for results from agents. In this deployment, the rest of the CometCloud ports are internal. Remember that CometCloud Space can be deployed across multiple machines, which increases the scalability of our object store. More details about WorkflowMaster configuration can be found in the Configuring Task Manager (or WorkflowMaster) Section.
Open a terminal and go to the directory simple_run/master, that you got after uncompressing the cometWorkflow.tgz file.
Edit comet.properties file
We only need to change the field IsolatedProxy with the public ip of the Task Manager machine, because the proxy will be running in the same machine.
IsolatedProxy=machine2.domain.comNote
Remember to send the comet.properties file to the Agents every time it is modified.
Edit nodeFie file
This file tells CometCloud where to start the services. The number 2 tells CometCloud that it has to start two peers (i.e. Request Handler and a Master).
machine2.domain.com:2
Edit exceptionFile file
This file is to set the roles of each CometCloud peer and their ports.
machine2.domain.com:5555
comet.NodeType=MASTER
machine2.domain.com:5556
comet.NodeType=REQUEST_HANDLER
Edit RequestHandlerList file
machine2.domain.com
Unchanged files
The following files do not need to be changed master.properties, portFie, chord.properties`, and squid.properties.
Starting the Service
Once the configuration is ready, you can start the Task Manager and CometCloud by executing the script startAll.sh.
$ ./startAll.sh
Deploy Agent for Cluster
We deploy an agent in machine3.domain.com, which is the front-end node of a cluster. The Task Service of this agent is listening on port 8880 for request from workers and replies from Task Manager (machine where request handler is running); the Local Resource Management Service is listening in port 9889 for commands from Autonomic Scheduler; and File Server is listening in port 6668 for queries from workers.
Open a terminal and go to the directory simple_run/agent, that you got after uncompressing the cometWorkflow.tgz file.
comet.properties file
Replace local file with the file that has been modified in Task Manager.
Edit agent.properties file
This file contains the information required to configure the different services of an Agent. We are going to explain the content of this file by sections.
#Task Service
publicIpAgent=machine3.domain.com
portAgent=8880
MaxNoTaskRetries=100
logFile=Agent.log

#File Server
StartFileServer=true
FileServerPort=6668
FileServerMaxThreads=10
StageFileDir=/tmp/stage/

#Local Resource Management Service configuration
StartManager=true
MgmtPort=9889
CentralManagerServer=machine1.domain.com:7778
MonitorInterval=30

#Resource configuration
Resources=cluster:clusterDell
Configuring a Cluster (clusterDell)
We find the clusterDell configuration file in the directory. Thus, we only need to modify the resource information, and the software . More information about how to configure a cluster can be found in Configuring a Cluster Section.
#resource information
Overhead=5
WorkerLimit=192.168.2.156:1;192.168.2.157:1
Cost=192.168.2.156:0.6;192.168.2.157:0.12
Perf=192.168.2.156:0.67;192.168.2.157:1.34
#port where worker will be started
workerPortRange=7777:7788

#supported apps
SupportedApps=testapp2,testapp3,sampleTutorial
testapp2=tassl.application.cometcloud.sample.AppWorker
testapp3=tassl.application.cometcloud.sampleNonBlocking.AppWorker
sampleTutorial=tassl.application.cometcloud.sampleTutorial.AppWorker

#Resource Information internal to the worker machine (i.e. 192.168.2.156)
SoftwareDirWorker=/cac/soft/cometcloud/
UserWorker=userid
WorkingDir=/tmp/work/
Important
SoftwareDirWorker. Software directory in worker machine. Directory where the software is expected to be in the resource for each application. For example, the software of sampleTutorial is expected to be in the path <SoftwareDirWorker>/sampleTutorial/ (i.e. /cac/soft/cometcloud/sampleTutorial/). Inside that directory we must have any binary required by our application plus the dist and lib directories with the CometCloud jar files as well as the specific worker application jar. More details can be found in Configure Cluster worker.
Configure Agent machine
Configure Agent machine to automatically trust worker machines (SSH first handshake). First make sure you have a directory called .ssh in your home directory, if not you can create it executing mkdir ~/.ssh. Then create a file inside that directory called config (file should be ~/.ssh/config)
Host *
    StrictHostKeyChecking no
    ForwardAgent yes
Typically we would want to retrieve data from other Agents. In this way we can make use of intermediate results that are available at remote sites or we can exploit data locality by retrieving the copy of a file that is closest to us. For this we should be able to ssh with no password between Agents.
- Generate sshkey in each agent by executing ssh-keygen. Press enter to all questions and do not establish a passphrase.
- Add public ssh key to all other Agents and data storage sites from which Agents may retrieve data. Copy the content of the file ~/.ssh/id_rsa.pub and place insert it in the file ~/.ssh/authorized_keys of all other Agents. If ~/.ssh/authorized_keys does not exist, you can create it and make sure that the permissions are 0600 (chmod 0600 ~/.ssh/authorized_keys).
Starting the Service
Once the configuration is ready, you can start the Agent by executing the script startAgent.sh.
$ ./startAgent.sh
Deploy Agent for Cloud
We deploy an agent in a virtual machine (VM) running in the Chameleon Cloud, let us assume that its fqdn is machine4.domain.com. The Task Service of this agent is listening on port 8880 for request from workers and replies from Task Manager (machine where request handler is running); the Local Resource Management Service is listening in port 9889 for commands from Autonomic Scheduler; and File Server is listening in port 6668 for queries from workers.
Open a terminal and go to the directory simple_run/agent, that you got after uncompressing the cometWorkflow.tgz file.
Open Ports
Open the following ports in the default security group. For this example we will need the following TCP ports open to everyone (0.0.0.0/0): 22, 12342, 8880, 6668, 9889, and range of ports 7777:7888.
Deploy Agent VM
Deploy VM named CometCloudAgent, Associate public ip. We assume that this public IP is machine4.domain.com. Update software, place your novarc configuration file, change agent.properties, and replace comet.properties. More details about files to edit below. To learn how to use this cloud go to use the Chameleon go to their website Chameleon User Guide
comet.properties file
Replace local file with the file that has been modified in Task Manager.
Edit agent.properties file
This file contains the information required to configure the different services of an Agent. We are going to explain the content of this file by sections.
#Task Service
publicIpAgent=machine4.domain.com
portAgent=8880
MaxNoTaskRetries=100
logFile=Agent.log

#File Server
StartFileServer=true
FileServerPort=6668
FileServerMaxThreads=10
StageFileDir=/tmp/stage/

#Local Resource Management Service configuration
StartManager=true
MgmtPort=9889
CentralManagerServer=machine1.domain.com:7778
MonitorInterval=30

#Resource configuration
Resources=cloud:cloudOSChameleon
Configuring a Cloud (cloudOSChameleon)
We find the clusterOSChameleon configuration file in the directory. Next we show only those fields that may need modification. More information about how to configure a cloud can be found in Configuring a Cloud Section.
key=/home/cc/jdiaznova.pem
ProviderType=openstack_nova
Region=regionOne
ProviderConfigFile=/home/cc/novarc

#Resource information
Overhead=20
VMLimits=m1.small:2;m1.medium:3;m1.large:3
WorkerLimit=m1.small:1;m1.medium:1;m1.large:1
Cost=m1.small:0.06;m1.medium:0.12;m1.large:0.24
Perf=m1.small:0.5;m1.medium:1;m1.large:1.99
CostDataIn=0.01
CostDataOut=0.12
workerPortRange=7777:7888

#supported apps
SupportedApps=testapp2,testapp3,sampleTutorial
testapp2=tassl.application.cometcloud.sample.AppWorker
testapp3=tassl.application.cometcloud.sampleNonBlocking.AppWorker
sampleTutorial=tassl.application.cometcloud.sampleTutorial.AppWorker

defaultImageId=CometCloudWorkerTutorial

#Resource Information internal to the worker VM
SoftwareDirWorker=/home/cc/
UserWorker=cc
WorkingDir=/home/cc/
Important
We assume that we have a worker VM image named CometCloudWorkerTutorial, see Worker Cloud VM image configuration Section to learn how to create this VM.
Note
SoftwareDirWorker. Software directory in worker machine. Directory where the software is expected to be in the resource for each application. For example, the software of sampleTutorial is expected to be in the path <SoftwareDirWorker>/sampleTutorial/ (i.e. /home/cc/sampleTutorial/) . Inside that directory we must have any binary required by our application plus the dist and lib directories with the CometCloud jar files as well as the specific worker application jar.
Edit cloud configuration file
Example for Chameleon, Alamo site. We use the provider openstack_nova with this configuration. Once you create the configuration file, make sure that it works using the nova command line interface. The FutureSystems OpenStack Manual is a good tutorial to learn on how to use the nova command line interface. You need to put your OpenStack password in OS_PASSWORD. To obtain your nova configuration file you can do it from the online portal Chameleon User Guide.
#!/bin/bash

# To use an Openstack cloud you need to authenticate against keystone, which
# returns a **Token** and **Service Catalog**. The catalog contains the
# endpoint for all services the user/tenant has access to - including nova,
# glance, keystone, swift.
#
# *NOTE*: Using the 2.0 *auth api* does not mean that compute api is 2.0. We
# will use the 1.1 *compute api*
export OS_AUTH_URL=https://proxy.chameleon.tacc.utexas.edu:5000/v2.0

# With the addition of Keystone we have standardized on the term **tenant**
# as the entity that owns the resources.
export OS_TENANT_ID=FG-337
export OS_TENANT_NAME="FG-337"

# In addition to the owning entity (tenant), openstack stores the entity
# performing the action as the **user**.
export OS_USERNAME="javidiaz"

# With Keystone you pass the keystone password.
#echo "Please enter your OpenStack Password: "
#read -sr OS_PASSWORD_INPUT
export OS_PASSWORD="mypassword"

# If your configuration has multiple regions, we set that information here.
# OS_REGION_NAME is optional and only valid in certain environments.
export OS_REGION_NAME="regionOne"
# Don't leave a blank variable, unset it if it was empty
if [ -z "$OS_REGION_NAME" ]; then unset OS_REGION_NAME; fi
Testing Nova Client
We should test that our cloud configuration file works. For this we should execute the following commands in the agent VM.
$ sudo apt-get install python-nova
$ source novarc
$ nova list
$ nova image-list
VMs Firewall
In a typical cloud configuration all ports are closed by default. Hence, it is required for us to open them. This is done by modifying the security group (e.g., in OpenStack there is a section called Access & Security). We need to make sure that we made modification in the default security group. The specific ports that you need to open are: (i) for worker VMs we need to open the ports specified in portRange, and (ii) for an agent VM we need to open the ports specified in portAgent, FileServerPort, MgmtPort, and the port 12342 (or the port specified in variable IsolatedProxyPort in comet.properties, if defined).
Configure Agent machine
Configure Agent machine to automatically trust worker machines (SSH first handshake). First make sure you have a directory called .ssh in your home directory, if not you can create it executing mkdir ~/.ssh. Then create a file inside that directory called config (file should be ~/.ssh/config). Make sure that the permissions are 0600 (chmod 0600 ~/.ssh/config).
Host *
    StrictHostKeyChecking no
    ForwardAgent yes
Typically we would want to retrieve data from other Agents and from data sources (InputData field in the workflow XML). In this way we can make use of intermediate results that are available at remote sites or we can exploit data locality by retrieving the copy of a file that is closest to us. For this we should be able to ssh with no password between Agents.
- Generate sshkey in each agent by executing ssh-keygen. Press enter to all questions and do not establish a passphrase.
- Add public ssh key to all other Agents and data storage sites from which Agents may retrieve data. Copy the content of the file ~/.ssh/id_rsa.pub and place insert it in the file ~/.ssh/authorized_keys of all other Agents. If ~/.ssh/authorized_keys does not exist, you can create it and make sure that the permissions are 0600 (chmod 0600 ~/.ssh/authorized_keys).
Starting the Service
Once the configuration is ready, you can start the Agent by executing the script startAgent.sh.
$ ./startAgent.sh
Executing Workflows
Open a terminal and go to the directory simple_run/client, that you got after uncompressing the cometWorkflow.tgz file.
Defining workflow
We are going to define a workflow to execute the sample application called mapreduce. This workflow has two stages, one that generates PR tasks per input file (map method) and another that aggregates all results and produces a final consolidated result file (reduce method). The results of stage 1 will be placed in the staging area of the Agent that managed the execution of those tasks. sample.properties has different values useful for the application. We have a created a workflow called workflowSample.xml with the following content.
<xflow name="SimpleWorkflow">

<!--Stages definition -->
<stages>

<!-- Stage 1 -->
  <stage id="S1" type="AppGenerateClass" value="tassl.application.cometcloud.sampleTutorial.GenerateTasks" method="map"/>
  <stage id="S1" type="PropertyFile" value="./sample.properties"/>
  <stage id="S1" type="Application" value="sampleTutorial"/>
  <stage id="S1" type="InputData">
    <InputData value="jdiaz@sierra.futuregrid.org:/tmp/inputs/" zone="zoneA" site="siteSierra" constraint="zoneA,siteIndia,siteAlamo"/>
  </stage>
  <stage id="S1" type="Results" value="" zone="" site="" constraint=""/>

<!-- Stage 2 -->
  <stage id="S2" type="AppGenerateClass" value="tassl.application.cometcloud.sampleTutorial.GenerateTasks" method="reduce"/>
  <stage id="S2" type="PropertyFile" value="./sample.properties"/>
  <stage id="S2" type="Application" value="sampleTutorial"/>
  <stage id="S2" type="InputData">
  </stage>
  <stage id="S2" type="Results" value="jdiaz@sierra.futuregrid.org:/home/output/" zone="zoneB" site="siteSierra" constraint="siteSierra"/>

</stages>

<!-- Scheduling Policies -->
<objectives>
  <objective id="S1" type="MinRunningTime" value="0" />
  <objective id="S2" type="MinRunningTime" value="0" />
</objectives>

<!-- Dependencies -->
<transitions>
  <transition from="S1" to="S2" blocking="true"/>
</transitions>

</xflow>
Important
Please make sure that you can SSH without password to the machine specified in the InputData field. Otherwise you may get an exception or the execution of the workflow may halt.
Important
Please make sure that the directory specified in InputData (e.g., jdiaz@sierra.futuregrid.org:/tmp/inputs/”) contains files. Otherwise, the workflow will not do anything or you may get some exceptions.
sample.properties file
We define properties for the application in this file. We are going to define PR=1, which means that we create one task per input file. We also define minTime and maxTime to indicate the estimated completion time of the tasks. Finally, we define ReferenceBenchmark to allow the system estimate the completion time of the tasks in heterogeneous resources (i.e. all resources in the system have a benchmark score calculated using the same benchmark). The content of this file is as follows.
PR=1
minTime=10
maxTime=100
ReferenceBenchmark=5757
Create dummy input files
As InputData we defined that the input files will be located in the machine sierra.futuregrid.org in the directory /tmp/inputs/ and that they can be accessed with the user jdiaz. The task generator will try to ssh to list the files within the directory and the agents will also ssh to retrieve the files for computation. Hence, we should have SSH no password configured.
Important
We need to be able to SSH no password to the machine sierra.futuregrid.org from machine2.domain.org, machine3.domain.org, and machine4.domain.org.
To create the files we ssh into sierra.futuregrid.org, and create files executing the following command:
$ cd /tmp/inputs
$ dd if=/dev/zero of=file1 bs=1024 count=0 seek=1024
$ dd if=/dev/zero of=file2 bs=1024 count=0 seek=1024
$ dd if=/dev/zero of=file3 bs=1024 count=0 seek=1024
$ dd if=/dev/zero of=file4 bs=1024 count=0 seek=1024
$ dd if=/dev/zero of=file5 bs=1024 count=0 seek=1024
Managing workflow
Register workflow
$ workflowClient.sh -serverAddress machine1.domain.com -serverPort 8888 ‐regWorkflow workflowSample.xmlCheck status of the workflow identified by the ID 21312541
$ workflowClient.sh -serverAddress machine1.domain.com -serverPort 8888 ‐checkStatus 21312541Retrieve results from workflow identified by the ID 21312541. The user in the remote machine is jdiaz and I would like to get the results in my local directory /home/jdiaz/results/
$ workflowClient.sh -serverAddress machine1.domain.com -serverPort 8888 ‐retrieveResutls 21312541 -user jdiaz -path /home/jdiaz/results/